How do I Record Google Meet Calls for Free Without Permsission.
Many of us at the moment are a part of more conferences and video conferences than ever and due to providers like Google Meet and Zoom, reaching out to others is as straightforward as clicking a button. While beginning and becoming a member of conferences is a fairly easy affair, you would possibly need to save a recording of the assembly you’re part of to investigate the matters that had been mentioned, revisit your trainer or coach’s classes once more, or to only keep them saved as a reminiscence.
So, how would you file a session on Google Meet? Can you file calls with simply audio or video or each? That’s what we’re going to debate on this submit.
: How do I Share Audio on Google Meet
Does Google Meet have a file possibility?
Yes, however not without cost. While Google permits customers to file a name by way of Google Meet, the characteristic is presently solely accessible to clients of G Suite Business Standard and Plus, Enterprise, Education Fundamentals (however solely by means of the tip of 2021), Education Standard, Education Teaching, and Learning Upgrade, and Education Plus. What this primarily means is that you’ll have to pay at the least $12 per consumer per thirty days to have the ability to file your video calls on Google Meet.
▶ How do I file a Google Meet video assembly
Even if the characteristic was obtainable in your G Suite account, using the Record possibility inside Google Meet comes with its personal demerits. For starters, that you must ship requests for all individuals in a gathering for his or her consent to file the proceedings of the decision. While this can be an excellent factor when it comes to privacy, anticipate some time for everybody to just accept the consent after which begin a gathering recording may end up in a waste of time.
Another factor to know is that your recording might lose necessary discussions if somebody fails to just accept the consent, thus leading to an incomplete recording. Besides this, you could or might not see the recording possibility in your Meet display in case your group hasn’t enabled the characteristic in your account.
If you don’t need to be bothered by these issues, then you need to most undoubtedly learn additional and get to find out how you should still be capable of file audio or video out of your Google Meet calls with out paying for a G Suite membership.
: How do I End Meeting in Google Meet: Step-by-step Guide
Recording Google Meet assembly with out permission
Well, that’s doable, sure. Check out the strategies beneath to file a gathering on Google Meet with out permission in your common Gmail account. It isn’t straightforward and requires some setup, not to mention trusting an extension from Google Web Store, however in order for you it desperately, it’s most likely value it. Let’s try the strategies to file each the audio-only and video+audio conferences.
Record Google Meet Calls (Audio Only)
If all you need is to file the audio throughout a Google Meet, then the Fireflies Chrome Extension that’s a good way to do exactly that. This extension is accessible free-of-cost on Google Chrome and you could even be capable of use them on some Chromium-based browsers. You can use this technique to file audio on Google Meet from each Windows and Mac.
Install Fireflies Chrome Extension
To get began, set up the Fireflies Chrome Extension from the Chrome extension retailer. Inside this extensions web page, click on on the ‘Add to Chrome’ button from the highest proper nook.
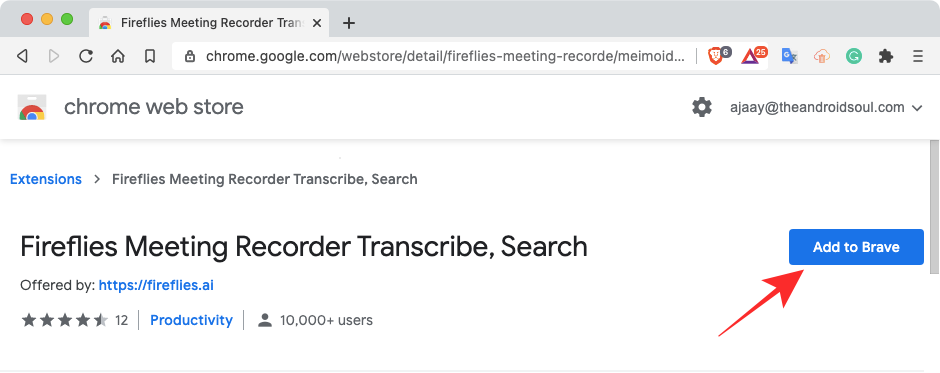
If you’re requested to verify this set up, achieve this by clicking on the ‘Add extension’ button.
After the extension has been put in, click on on the Extension icon on Google Chrome’s Navbar after which choose the Pin icon adjoining to the ‘Fireflies’ extension.
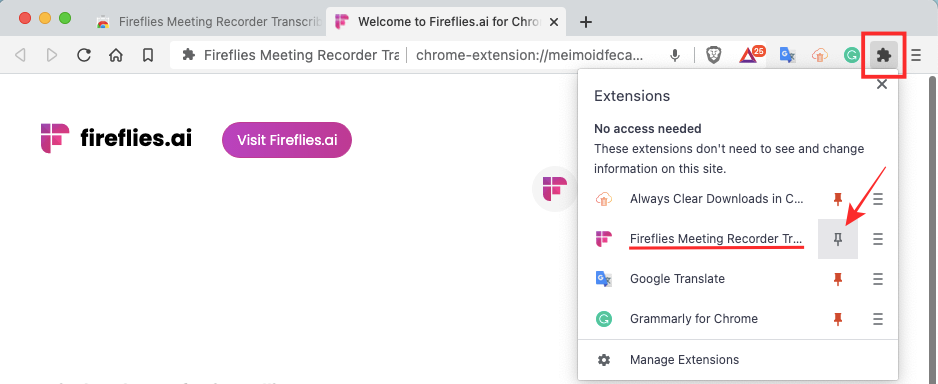
This will be sure that the Fireflies extension is well accessible throughout Google Meet calls.
Set up your free Fireflies account
Once the Fireflies extension has been enabled inside Chrome, you may proceed to set it up using your Google account. Fireflies requires you to present it entry to your Google account in order that your conferences may be recorded and the service may also keep a dashboard for you.
For this, click on on the Fireflies icon from the Extensions toolbar on the high proper nook of Google Chrome. In the menu that seems, click on on the ‘Continue with Google’ possibility.

You will now want to decide on the Google account you employ in your Google Meet calls.

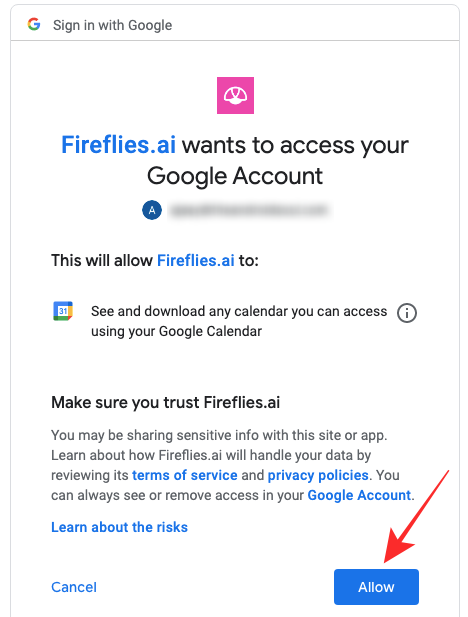
On the following display, Fireflies will immediate that it wants your permission to entry your Google account’s calendar for it to work correctly. Click on the ‘Allow’ button to proceed.
That’s it. Your Fireflies account is now arrange by means of Google. You can go forward and begin recording your present session.
Record audio from Google Meet
When you’ve arrange Fireflies and linked it together with your Google account, you can begin recording at any time. For this, go to meet.google.com and be part of/begin a video name together with your desired individuals. When you’re contained in the assembly on Google Meet, click on on the Fireflies icon from the extensions bar, after which choose the ‘Start Recording’ button when an overflow menu seems.
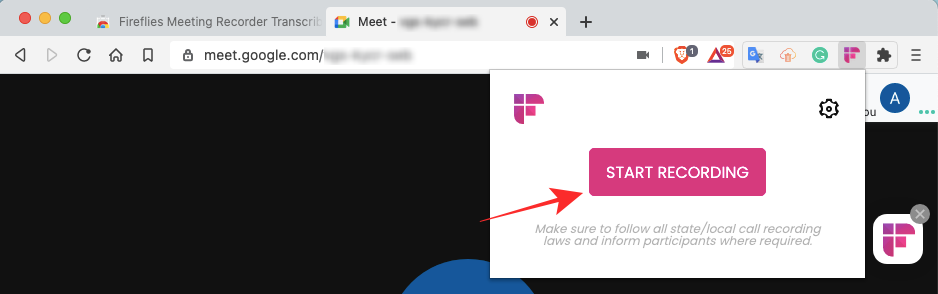
Your assembly’s audio will now be recorded and a Fireflies widget will seem on the left-hand aspect of the assembly display when the recording commences. To verify if the recording is in progress, look out for a inexperienced icon on the backside of this widget.
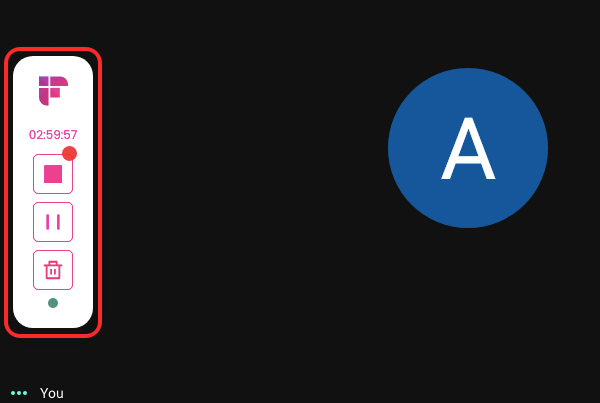
At any time, you may pause a recording by clicking the Pause icon on the Fireflies widget.
If you don’t need to save your recording, click on on the Trash icon on the backside of the widget.
To cease your recording and put it aside, click on on the Stop icon contained in the Fireflies widget.
Your recording will finish as quickly as your click on on the Stop icon and when that occurs, you’ll get an possibility to call your recording and add mail IDs of customers you need to share it with. Fireflies offers you the choice to share the recording with individuals out of your domain, all individuals of a gathering, or simply your self.
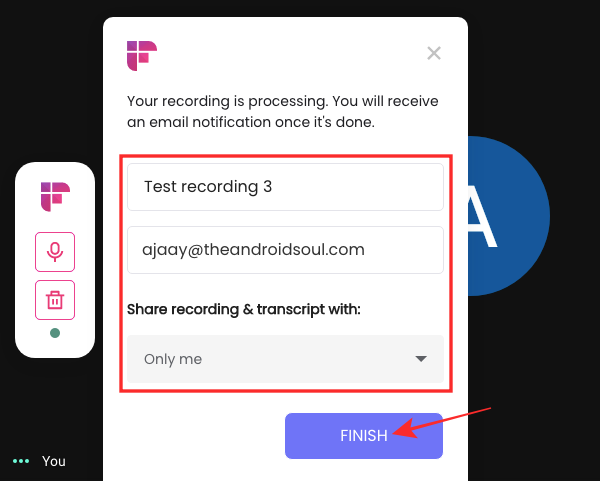
Once you’ve gotten entered the e-mail addresses of individuals you need to share with, click on on ‘Finish’.
Your recording will take a couple of minutes to be seen within the Fireflies library.
Access your recordings on Fireflies
You can get entry to all your recordings at any time inside your Fireflies Notebook web page. You may also get to this web page by clicking on the Fireflies extension icon on Google Chrome.
Click on the cogwheel icon on the high proper nook of the Fireflies extension popup.

Inside the popup, click on on the ‘Notebook’ possibility.
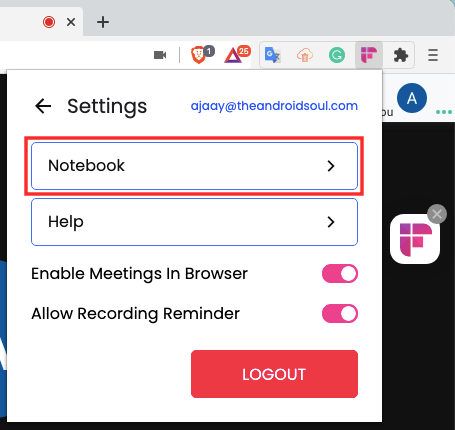
This will take you to the Notebook web page that lists the entire audio recordings out of your assembly on Google Meet. To play a recording or entry its particulars, choose it from the Notebook.

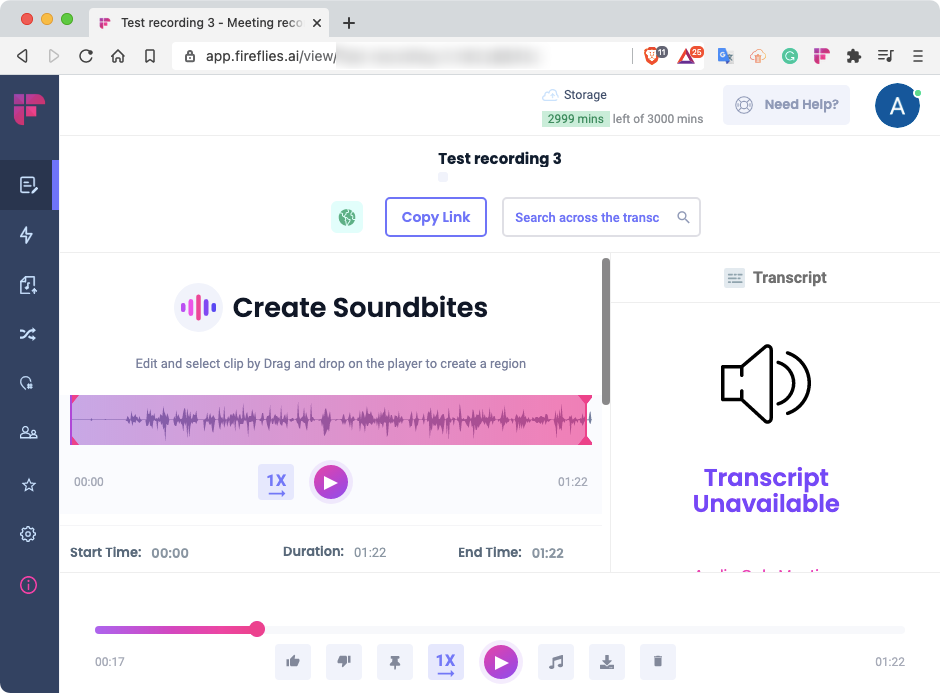
You ought to be capable of see your recording and all of its particulars on the following web page. Here, you may play/pause the recording, obtain it, pin it, change playback velocity, edit the clip to save lots of your required part, or delete it. You may also use the ‘Copy link’ button on the web page to simply share the audio clip with others.
How many recordings are you able to make on Fireflies?
Basic options on Fireflies can be found free-of-cost and that features having the ability to file audio for as much as 3,000 minutes without cost, moments, shareable hyperlinks, playback velocity management, time-stamped notes, and more. For greater storage capability, you may go for the service’s paid plans – Pro, Business, and Enterprise, the most cost effective of which begins at $18 per thirty days per consumer.
: How do I Freeze Your Screen or Camera on Google Meet
Record Google Meet Calls (Audio & Video)
If recording simply the audio of a Google Meet name doesn’t do the job for you, you need to use Vmaker in your desktop to retailer each audio and video recordings of a gathering. When you employ Vmaker, you solely have the choice to file video and audio collectively and never simply audio.
While there are a ton of instruments that allow you to file Google Meet calls, we selected Vmaker just because the service is accessible without cost with none limits to the variety of periods you may file and retailer and allows you to file your display in addition to the feed out of your webcam. At the time of penning this, the service is accessible as a desktop app solely on macOS whereas customers on Windows should suffice with a Chrome extension. An app is anticipated to launch on Windows, Android, and iOS quickly.
: How do I see everybody on Google Meet on PC and Phone
On Windows and Mac (Using Chrome extension)
Since Vmaker presently doesn’t have an app on Windows, we’re going to make use of the Vmaker extension from the Chrome Web Store. You may also observe this technique on macOS if you want Vmaker as an extension and never as an app. Now, set up the Vmaker extension by clicking on the ‘Add to Chrome’ button.

You’ll be requested to verify this set up which you are able to do by clicking on the ‘Add extension’ button.
After the extension is put in, click on on the Extension icon on Google Chrome’s Navbar after which choose the Pin icon adjoining to the ‘Vmaker’ extension.

This will be sure that the Vmaker extension is well accessible throughout Google Meet calls.
Once Vmaker is accessible inside Google Chrome, that you must enroll on Vmaker to begin using the service. To try this, click on on the Vmaker extension icon from the Extensions bar and anticipate the Vmaker popup to load.
On the following display, it is possible for you to to decide on whether or not you want to enroll using your Google or Facebook account or by means of different means. Choose the strategy you want to enroll with and authenticate the account as required.
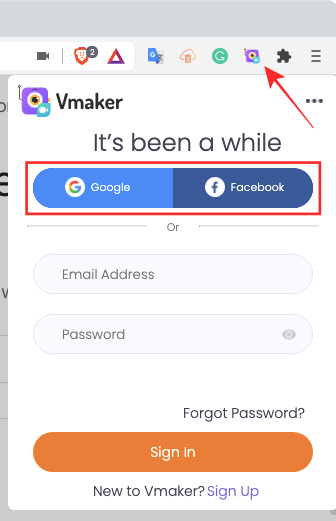
Only after you’ve gotten signed up on Vmaker, it is possible for you to to see all of the options supplied by the service. Now, you can begin or be part of a video name on Google Meet to get began.
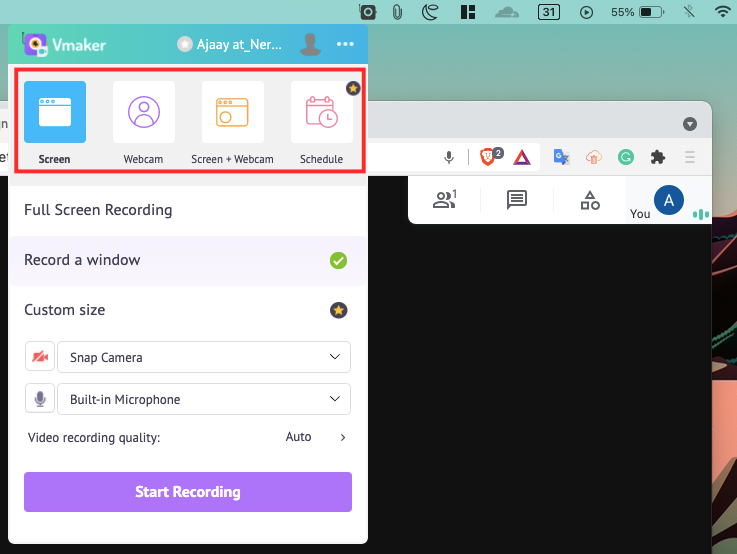
Once a gathering commences, click on on the Vmaker extension on the high proper nook. This will carry up an overflow menu that lets you choose the way you need to file the assembly and select the device you need to use for recording the session.

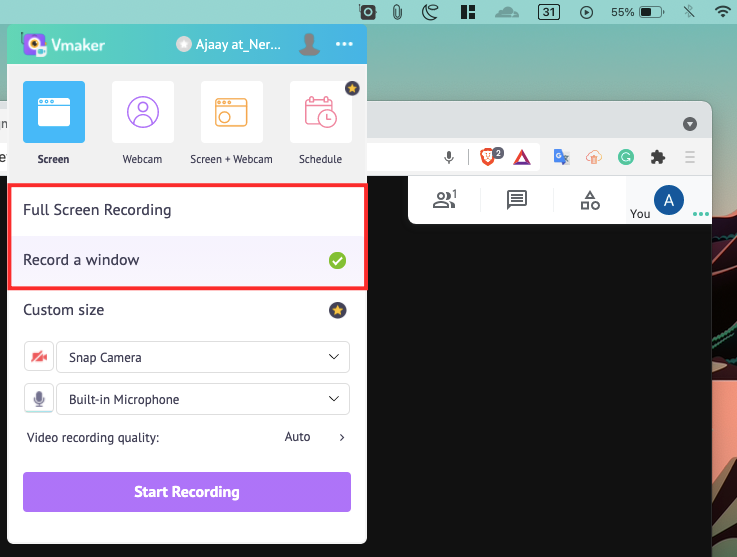
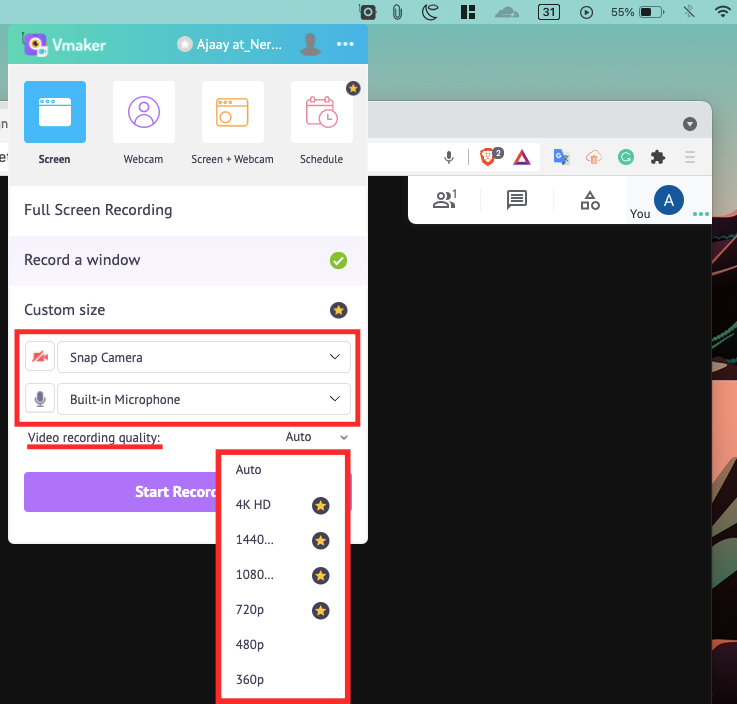
At the highest of this Vmaker extension, you may choose the kind of recording you need – Screen, Webcam, or each.

When you choose ‘Screen’ or ‘Screen + Webcam’, you should have the choice to decide on whether or not you need the recording to seize a single tab or the entire display.

You may also configure the enter device – your digital camera and microphone. You can select the default enter device you need to use by clicking the dropdown menu adjoining to the Camera and Microphone icons. Additionally, you may see if the extension has entry to those units as they’ll be struck out when they’re disabled.
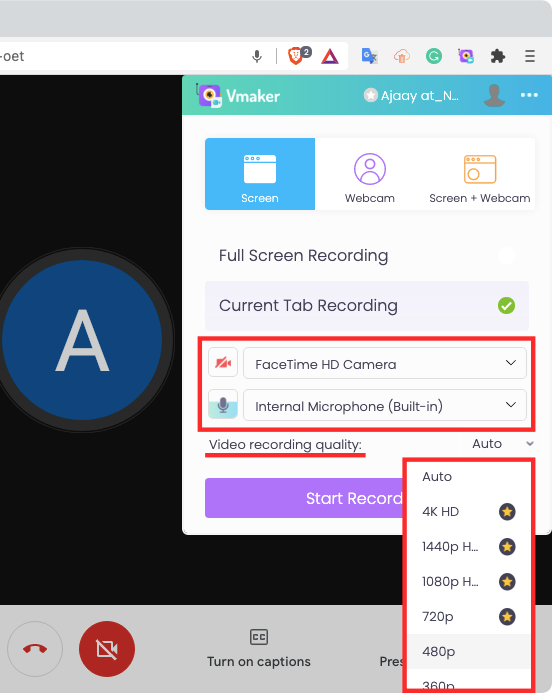
You may also change the video high quality of your recording by clicking the dropdown next to ‘Video recording quality’ after which selecting your most popular setting.
Once you’ve arrange the recorder together with your chosen configuration, click on on the ‘Start Recording’ possibility.
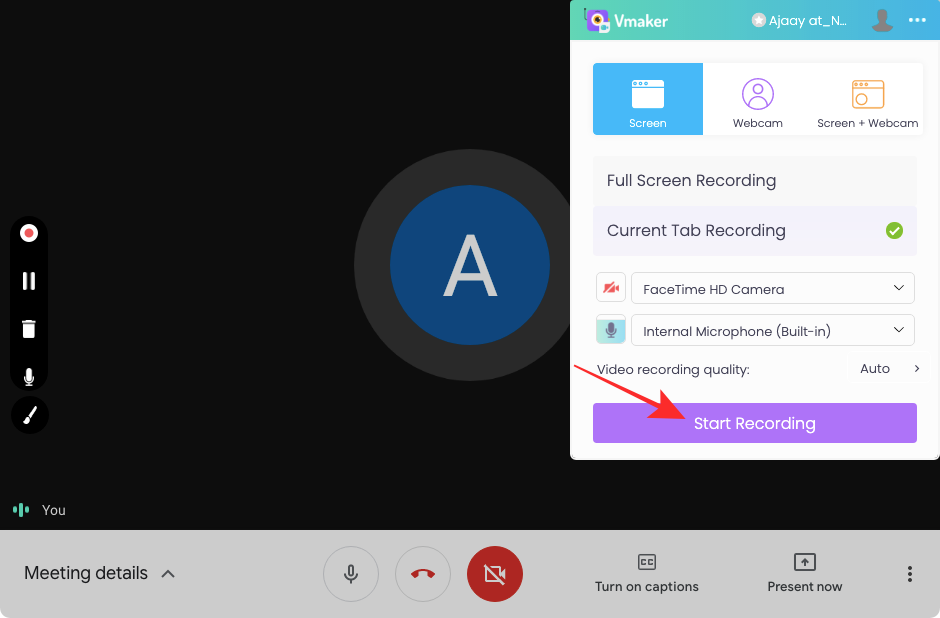
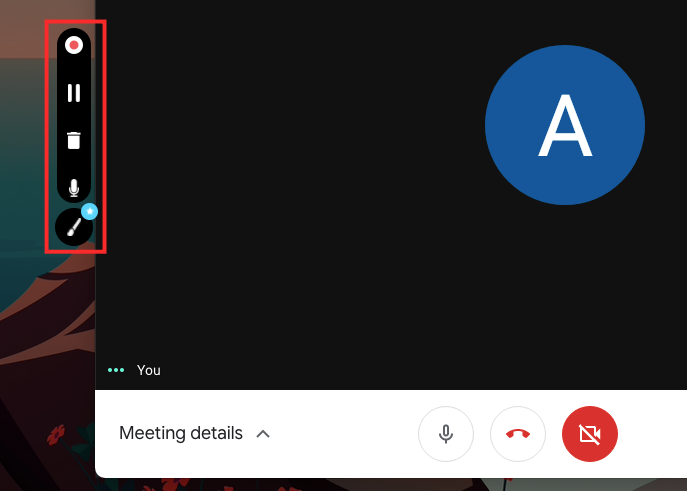
This will provoke your video recording and when this occurs, you will note the Vmaker widget on the left-hand aspect of your assembly display. This widget will broaden and provide more choices whenever you hover over it. When you hover over the widget, you may pause the recording, delete it, and disable the microphone.

When you’re completed recording your assembly, click on on the Record icon (the one on the high of the widget).

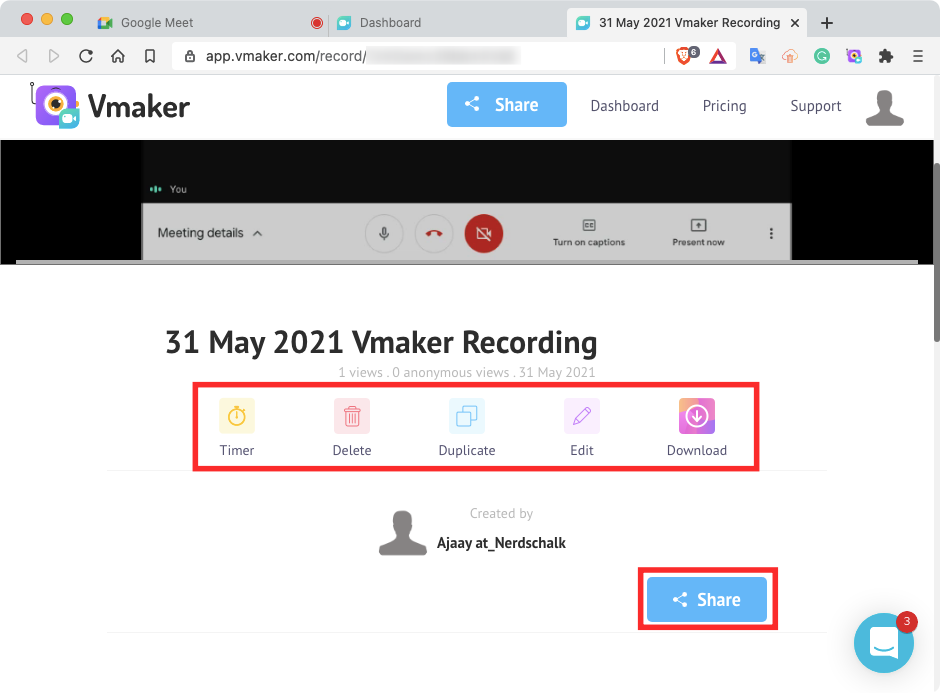
This will cease the recording immediately and your recording will seem inside a brand new tab on Google Chrome. You can play it by clicking the play icon and also you additionally get to broaden the video to a bigger view.

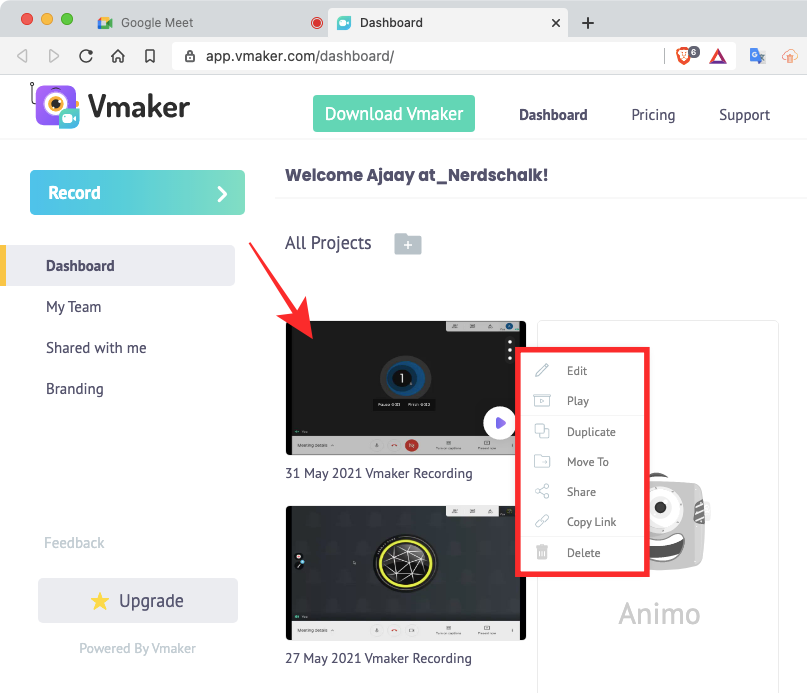
You can scroll down on this tab to entry more choices for the recording. From right here, you may delete the recording, edit it, duplicate, obtain, and share it with others. When you share the recording, anybody with a hyperlink to your recording will be capable of view it.
If you want to entry all your recordings made using Vmaker, click on on the Vmaker extension after which click on on the 3-dots icon contained in the popup menu.

Next, click on on the ‘My videos’ possibility from the brand new menu that seems.
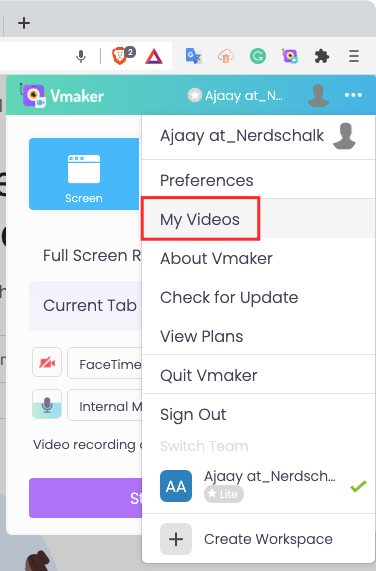
A tab will open up in your browser exhibiting you all of the movies that you’ve got recorded with Vmaker. You can merely click on on a recording you need to play or hover over a video’s 3-dots icon to get further choices like edit, play, duplicate, transfer, share, delete, or copy hyperlink.
On Mac solely (Using Vmaker app)
If you’re on macOS, you’ll be completely happy to know that Vmaker is accessible as a devoted app in your Mac. You can obtain the app from Vmaker instantly by clicking this hyperlink. You can then set up the app using the DMG file that will be downloaded in your system.
Once the Vmaker app has been put in, open it and set it up for the primary time using your Google/Facebook account or by way of an e mail handle in an identical method to how we confirmed you on the Vmaker extension.
When you open the Vmaker app and set it up for the primary time, you can be requested to present all of it the mandatory permissions in your Mac like entry to Camera, Microphone, Accessibility, and Screen Recording. While the app redirects you to the related part inside System Preferences, you may manually entry these controls by going to System Preferences, > Security & Privacy > Privacy, after which select the settings you need to give Vmaker entry to. After opening the person sections for Camera, Microphone, Accessibility, and Screen Recording, you may allow permissions for Vmaker by checking the bins adjoining to its app identify.

After you’ve gotten granted Vmaker all the mandatory permissions, now you can go forward and click on on the Vmaker icon out of your Mac’s Menu bar on the high. Now, you don’t HAVE to configure the next settings earlier than a gathering however we advise you to take action with a purpose to file your assembly as early as doable since a few of you could must tweak more choices than others.
When you click on on the Vmaker icon, Vmaker’s principal menu shall be seen permitting you to customise your recording choices. Just like its Chrome extension, the Vmaker app additionally reveals you choices to pick the kind of recording you need – Screen, Webcam, each, or Schedule (the final one isn’t obtainable on the extension and is a paid characteristic).
When you choose ‘Screen’ or ‘Screen + Webcam’, you should have the choice to decide on whether or not you need the recording to seize a single window or the entire display.
Then there’s the choice to configure the default enter device you need to use for the recording – your digital camera and microphone. Also obtainable is the power to alter the video high quality of your recording which you are able to do by clicking the dropdown next to ‘Video recording quality’. Paid customers additionally get to customise window dimension manually.
Once you’ve made all the mandatory tweaks to Vmaker, you may go forward and enter a gathering on Google Meet. To begin a recording now, click on on the Vmaker icon from the Menu bar on the high. When Vmaker opens, click on on the ‘Start Recording’ button.

If you chose the ‘Record a window’ possibility, you can be requested to decide on a window after which click on on ‘Start Recording’ once more.

This will begin your recording and you need to see the Vmaker widget positioned outdoors the left fringe of the window that’s being recorded. This widget will allow you to pause, delete, cease the recording or mute the audio in it.
You can even see a timer adjoining to the Vmaker icon contained in the Menu bar that may present how lengthy your recording is working.

After your recording is full, you may click on on the Record icon contained in the Vmaker widget to cease the recording.

When you cease a recording, Vmaker will robotically load the recorded content material in your default net browser. From right here, you may play it, delete, edit, duplicate, or obtain the recording. You may also share the recording with others using a hyperlink that you simply get after clicking the ‘Share’ button.

The remainder of the method is just like that of using Vmaker’s Chrome extension.
That’s all we have now on recording a gathering on Google Meet.
Check out more article on – How-To tutorial and latest highlights on – Technical News