How do I Make Your Gmail Account Safer (2023).
Email is a key a part of our on-line identification. It may give entry to a lot of our different on-line accounts. So, it’s crucial to guard our e mail from unhealthy folks.
Gmail has robust security options, however many people don’t find out about all of them. In this text, I’ll share an inventory of simple steps to assist shield your account from undesirable entry and dangerous actions.
First, we are going to cope with strengthening the safety of the Google account, after which we are going to dive into including additional safety measures to the Gmail account.
Read Also:
Gmail Advanced Search (Ultimate Guide)
Make Your Google Account Stronger
Let’s begin by strengthening your Google account. Every Gmail account can also be a Google account. I’ll information you thru the essential settings to ensure your account is protected from ordinary safety points. Plus, I’ll train you the way to regulate some issues to reinforce its security.
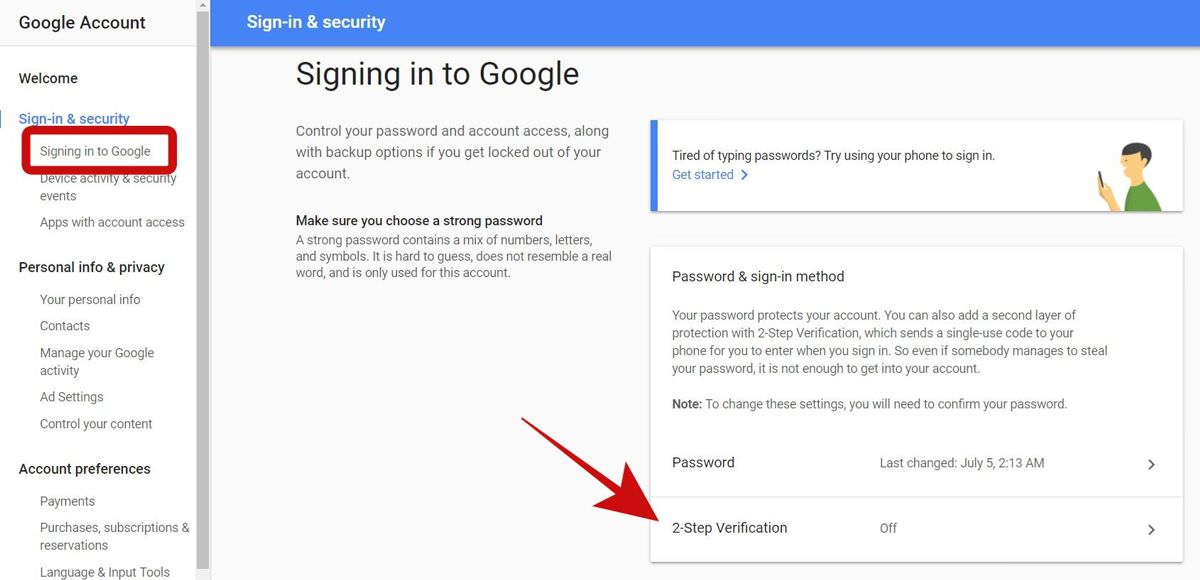
1. Activate 2-Step Verification
2-Step Verification is an additional security step that higher guards your account. It requires you to offer a second safety reply (not simply your password). So, it’s all the time a good suggestion to activate and use two-step verification.
Passkey is one other efficient technique to guard your Google account. Learn how to arrange Google Passkey to your account.
Here’s how one can set it up:
- Open Sign-in & safety in your browser and choose “2-Step Verification“.
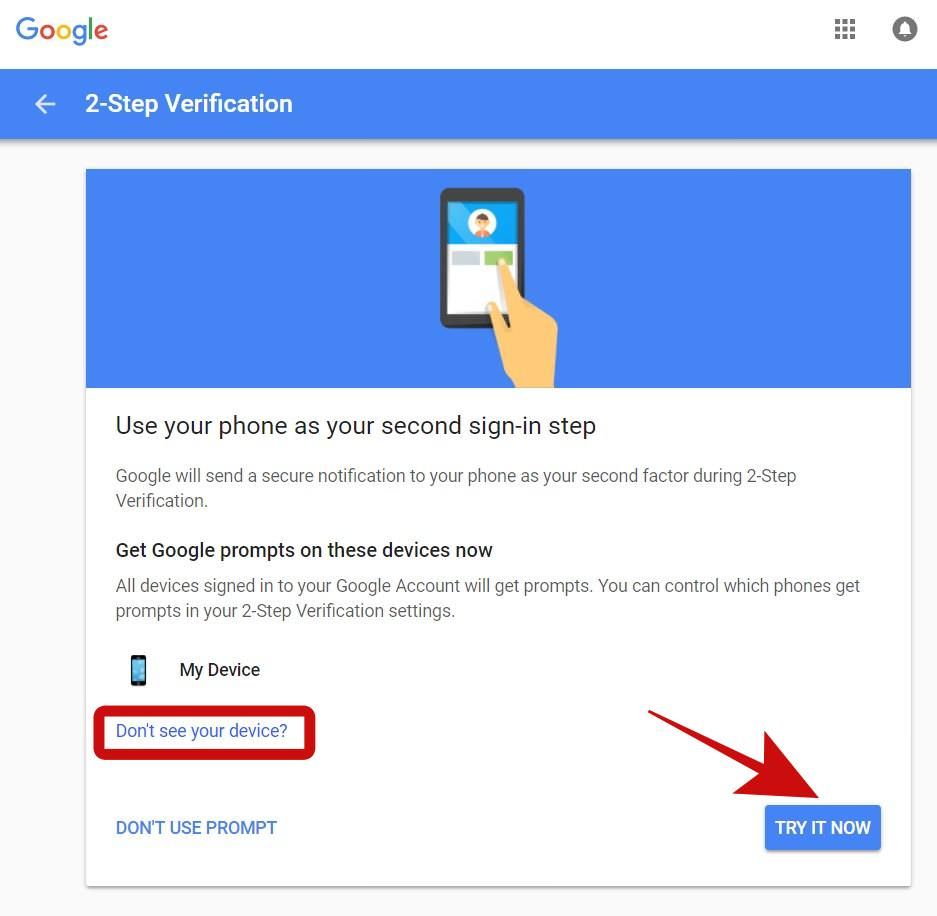
- Next, click on “GET STARTED“. Google will suggest using your phone for the second sign-in step, called Google Prompt. If you want to try this, click “TRY IT NOW“. If your phone isn’t listed, select “Don’t see your device?” so as to add it. But in case you desire using your telephone quantity, click on “DON’T USE PROMPT”.
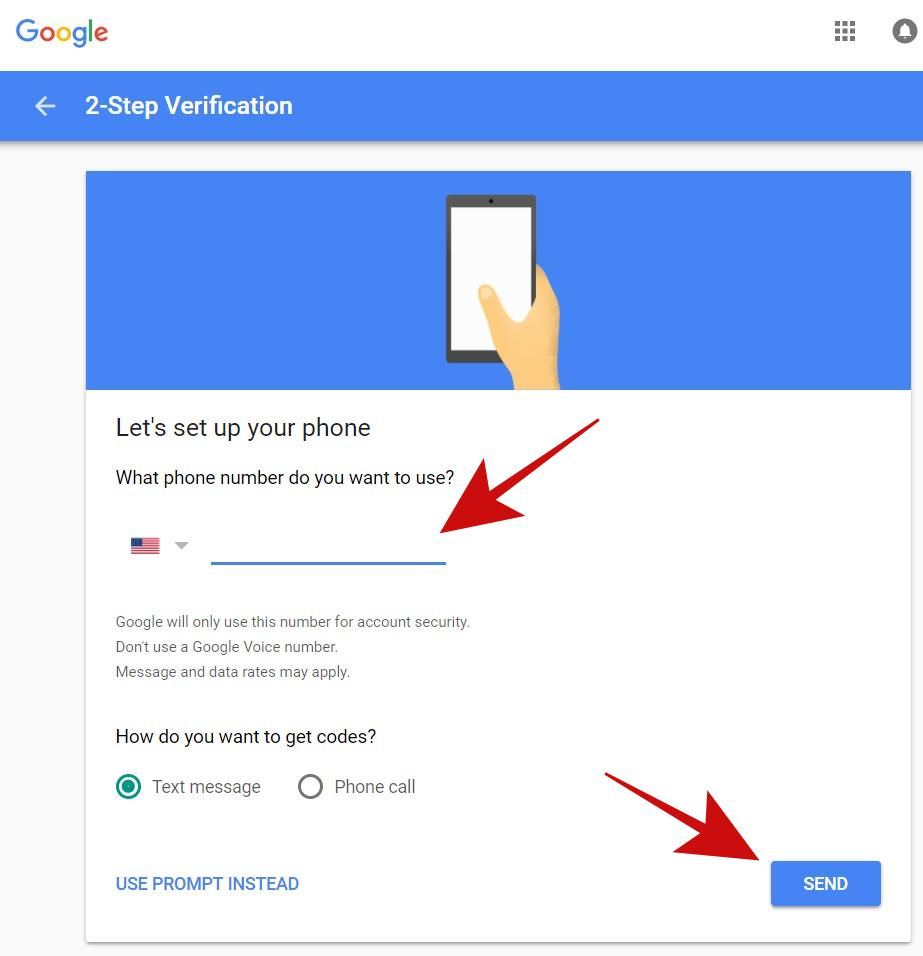
- If you selected “DON’T USE PROMPT” and need to use your telephone quantity for verification, enter your quantity and hit SEND. Google will ship a code to your telephone. Input that code when requested, and also you’re all set.
2. Add Backup Contact Details
It’s sensible to have backup contact particulars in case you possibly can’t entry a few of your data. Here’s how one can add them:
- Open Sign-in & safety in your browser and sign up if wanted.
- Select “Signing in to Google” on the left aspect, then discover the “Account recovery options” part.

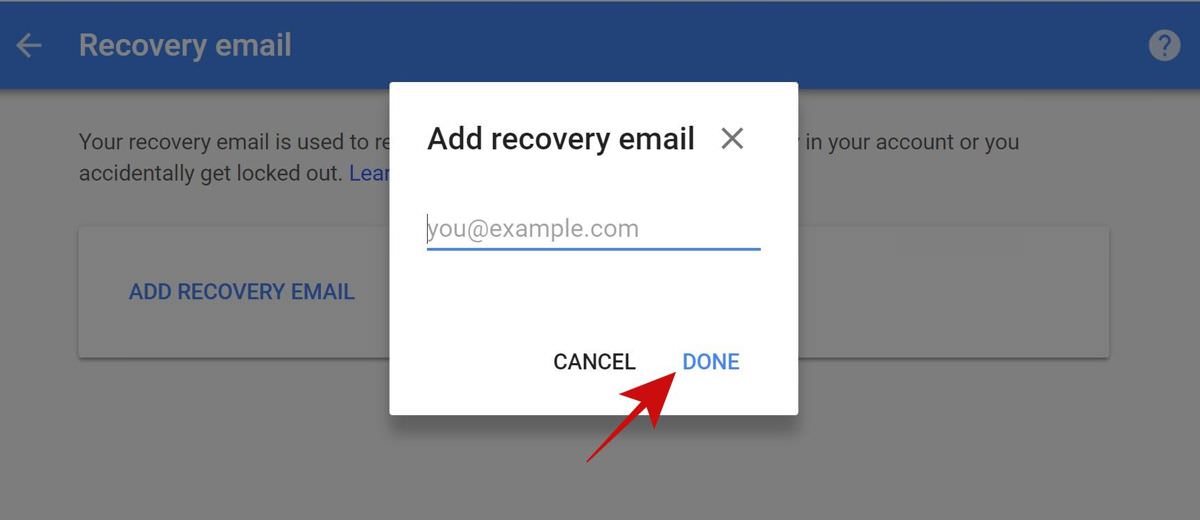
Add or Update Backup Email
Click “Recovery email”. Choose “ADD RECOVERY EMAIL” and enter the e-mail deal with you need as a backup. Click DONE. To change it, click on the pencil image and update the e-mail.
Add or Update Backup Phone Number
Click “Recovery phone”. Choose “ADD RECOVERY PHONE” and enter the telephone quantity you need as a backup. Click NEXT. Google will ask you to substantiate, so do this. To change it, click on the pencil image and update the telephone quantity.

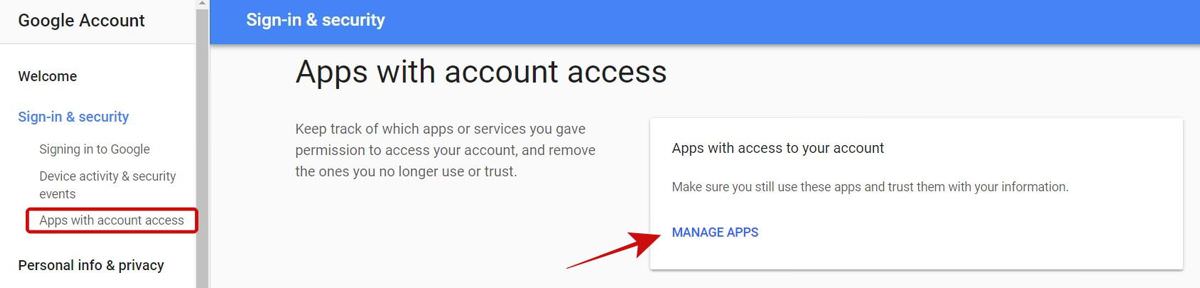
3. Remove Unapproved Apps
When you employ your Google account to sign up to an app or web site, you give it permission to entry your account. This permits it to entry your account at any time when it desires, however solely the data or providers you’ve accredited.
But you wouldn’t give a stranger the important thing to your house, proper? Similarly, it’s a good suggestion to test your account typically for apps you didn’t approve or not use and take away them. Here’s how:
- Open Sign-in & safety in your browser and sign up if prompted.
- Select “Apps with account access” on the left after which click on “MANAGE APPS“.
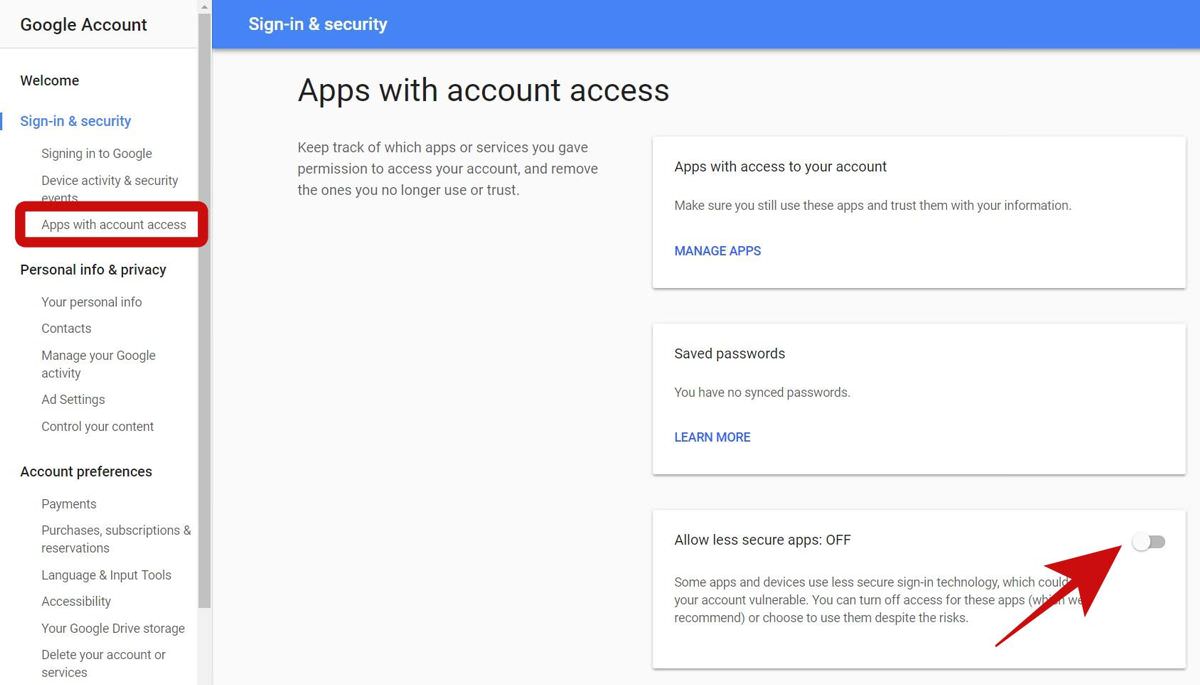
You’ll see an inventory of apps linked to your account. These are apps that may entry your account primarily based on their permissions. To see an app’s particulars, together with what it will possibly entry and whenever you accredited it, click on on the app. To take away it, click on “REMOVE ACCESS“. I recommend eradicating any apps you don’t acknowledge, didn’t approve, or not use.

4. Turn Off Low-Security Apps
“Allow less secure apps” lets apps with weaker safety entry your account. It’s best to maintain this off, even in case you turned it on for a particular motive, like using Microsoft Outlook to test your emails.
It’s safer to show this setting off and discover a totally different method to do what you want. For instance, you should use the brand new Gmail and its offline characteristic to test and handle your emails with out an web connection.
- Go to Sign-in & safety in your browser.
- Select “Apps with account access” on the left. Then flip off the setting that claims “Allow less secure apps”.
5. Review Important Account Activities
Keeping a watch on exercise logs is an effective method to spot potential unauthorized entry or hacking makes an attempt. Google retains a log of all of your account actions. It’s clever to test this repeatedly and mark any exercise that appears odd, like modifications you didn’t make. Here’s how to view this log:
- Go to Sign-in & safety in your browser.
- Select “Device activity & security events” on the left aspect.
- You’ll discover two sections: “Recent security events” and “Recently used devices“. Look through these for any unusual activity, like a login from a place you’ve never been. You can also click “REVIEW EVENTS” and “REVIEW DEVICES” to see more particulars.
Strengthen Your Gmail Account
After securing your Google account and organising primary protections, it’s time to focus in your Gmail account. Since this put up is about maintaining your emails protected, it’s crucial to know and use the security options of Gmail.
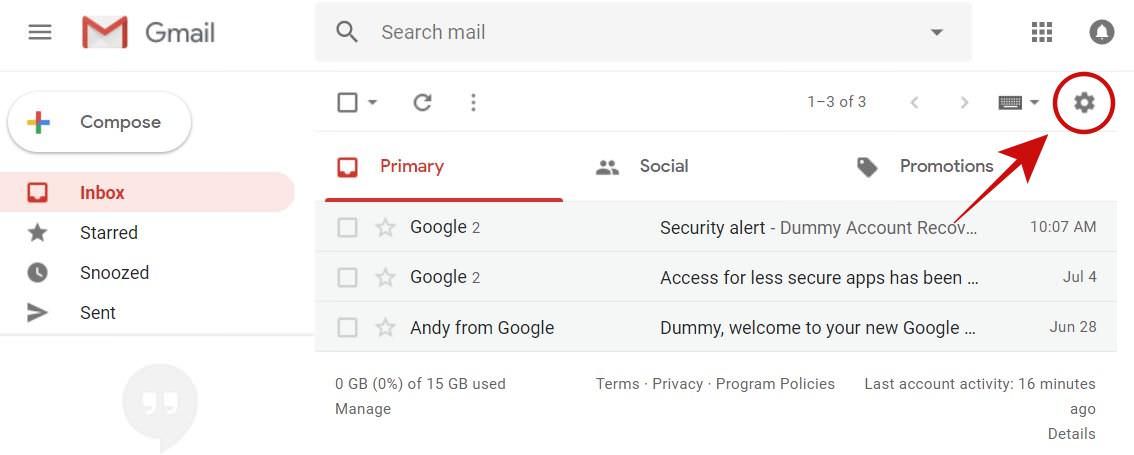
1. Review Gmail Settings
First, let’s look at the Gmail settings to make sure the whole lot is correctly. Gmail could not have a ton of choices, however the ones it has are important for e mail security. To begin, click on the gear icon in Gmail to open settings. Here’s what to search for:
1. General Tab
In this part, evaluation the next:
- Signature: Ensure your signature hasn’t been altered and doesn’t have any unfamiliar hyperlinks.
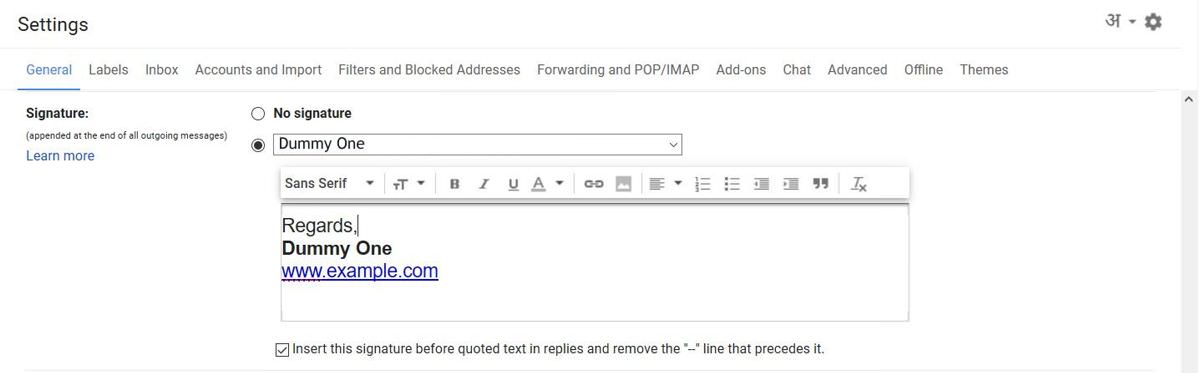
- Vacation Responder: Make positive it’s on or off primarily based in your desire and the message is appropriate.

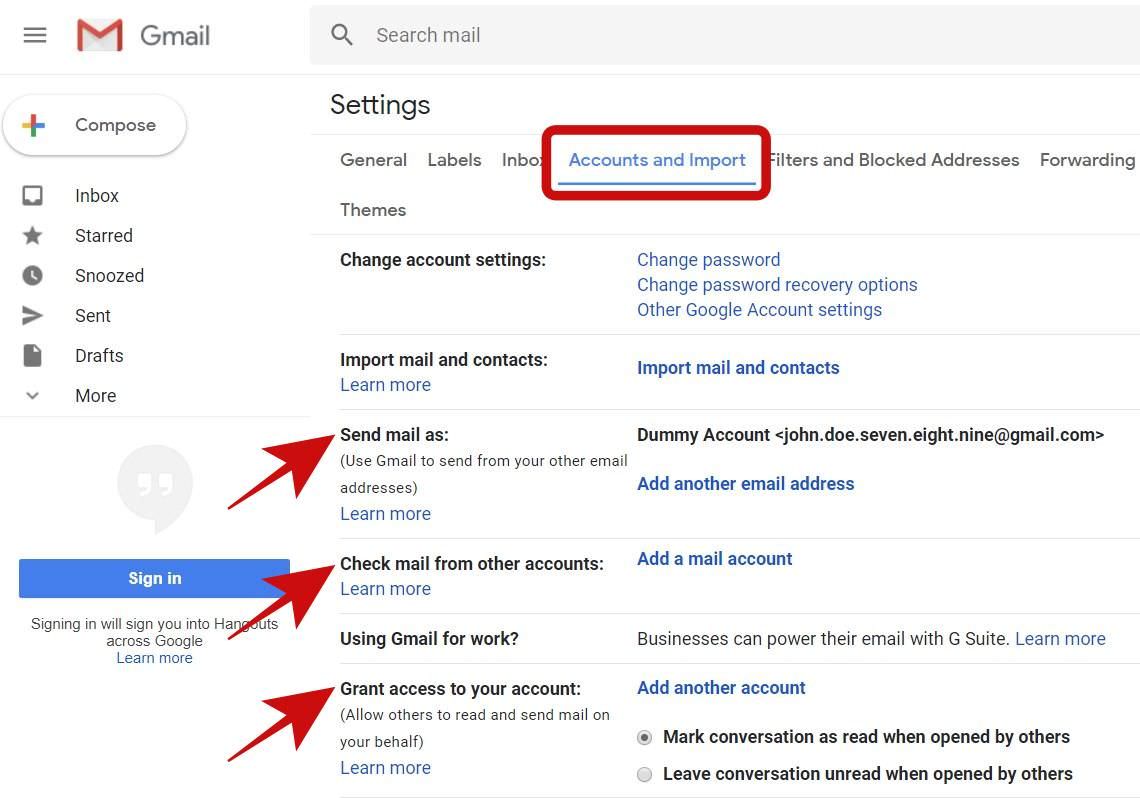
2. Accounts and Import Tab
Here, guarantee the next:
- Send Mail As: All e mail addresses on this part needs to be yours.
- Check Mail from Other Accounts: Every e mail deal with right here ought to belong to you. Otherwise, you possibly can unintentionally entry another person’s e mail.
- Grant Access to Your Account: This part shouldn’t have any unfamiliar addresses. If there’s an deal with you don’t acknowledge, somebody may need entry to your account, and you must take away them straight away. To do that, click on Delete next to their deal with.
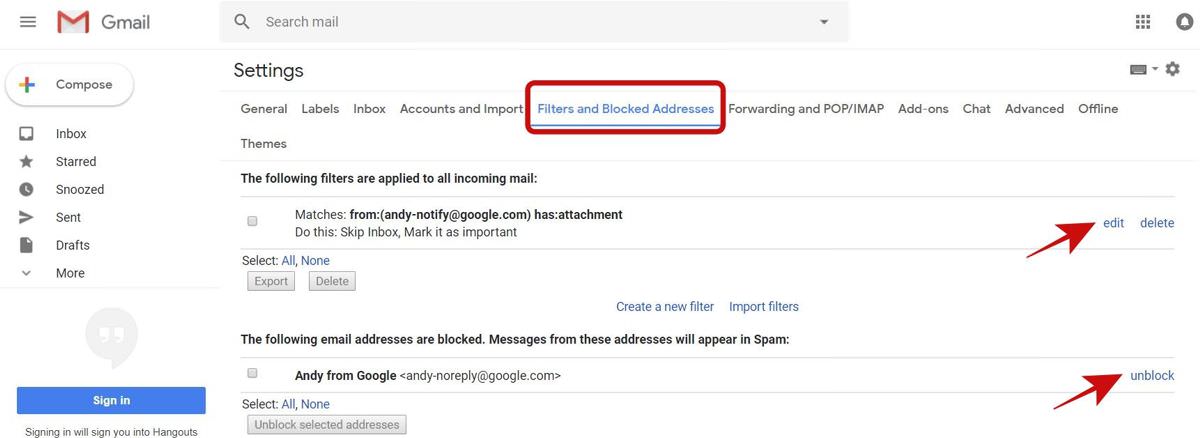
3. Filters and Blocked Addresses Tab
Within this part, you must evaluation:
- Filtered Emails: Ensure there aren’t any surprising filters. If there’s a filter that appears suspicious, take away it straight away.
- Blocked Emails: This part lists all the e-mail addresses you’ve blocked. You received’t get emails from these addresses, so guarantee none of them are essential or acquainted to you. If you discover an deal with you shouldn’t have blocked, unblock it.
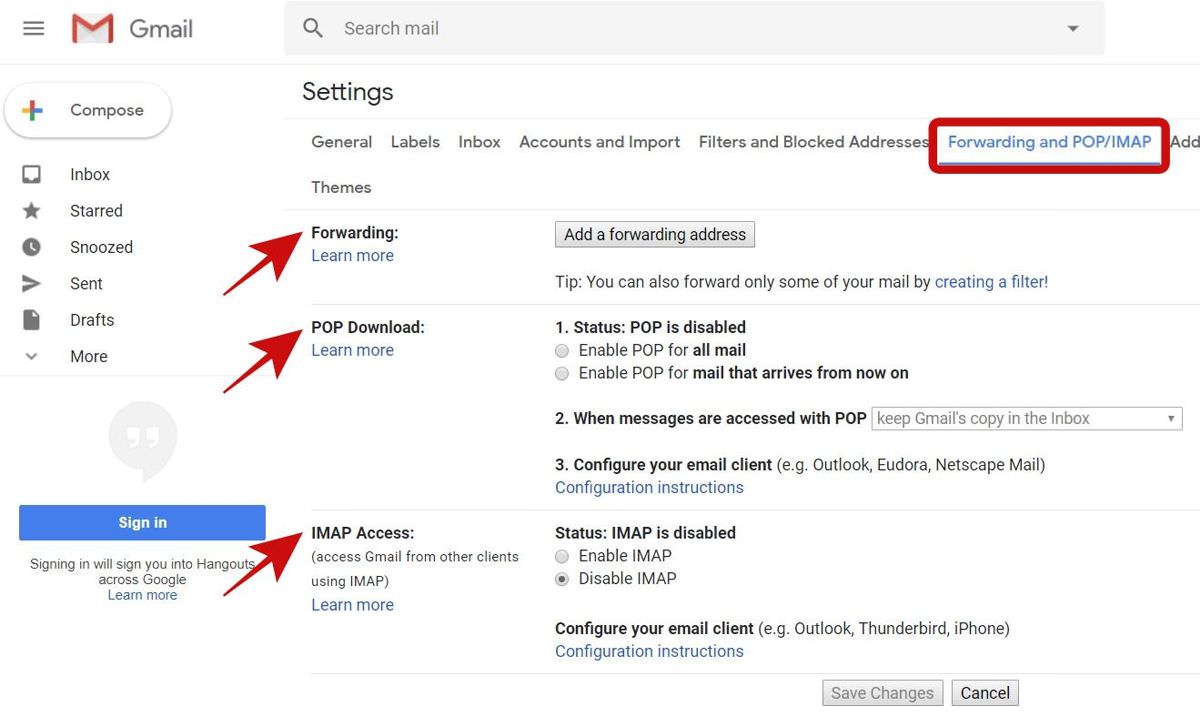
4. Forwarding and POP/IMAP Tab
Under this part, guarantee the next:
- Forwarding: Your emails shouldn’t be despatched to another person with out you figuring out. If there’s an unfamiliar deal with right here, take away it to forestall undesirable entry to your emails.
- POP Download: Make positive POP isn’t turned on in case you didn’t allow it.
- IMAP Access: Ensure IMAP is off in case you’re not using it.
2. Remove Suspicious Emails
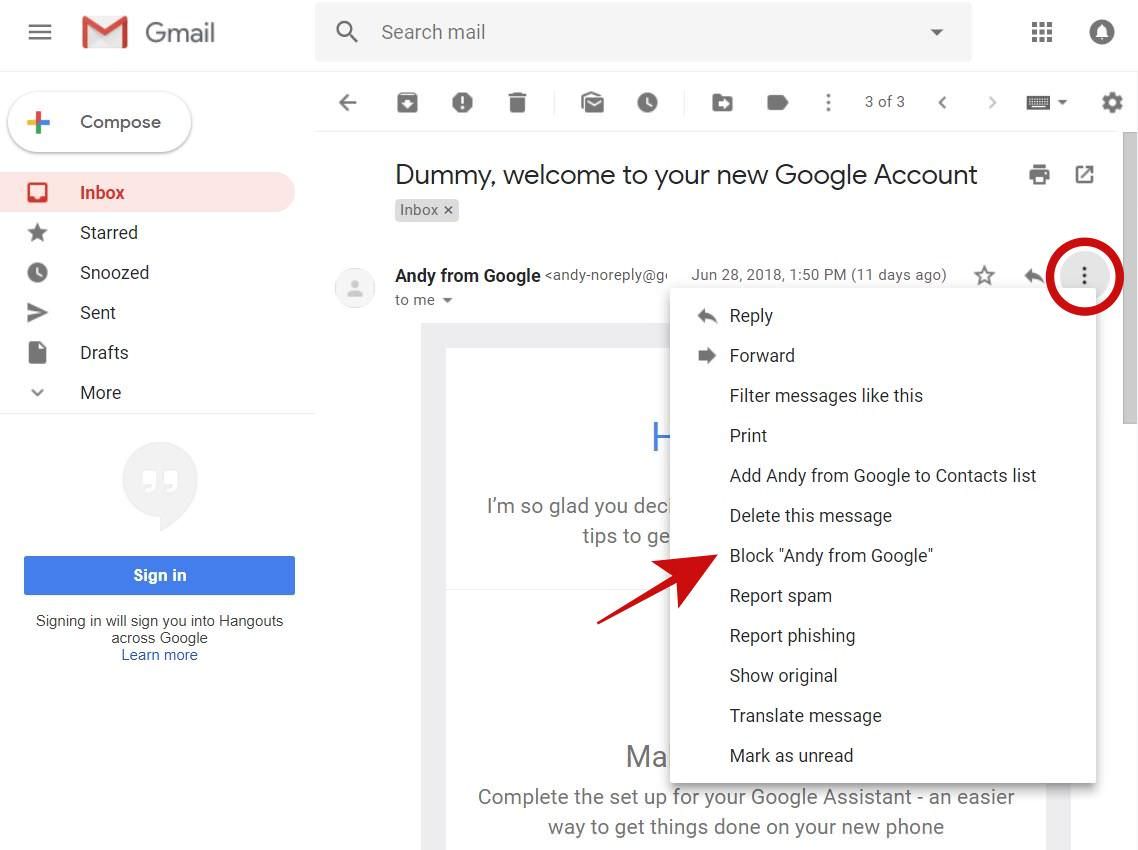
Block Unwanted Senders
If you get an e mail that appears unusual otherwise you don’t belief, and also you don’t need emails from that sender anymore, you possibly can block them. Gmail will then transfer their future emails to Spam.
To block an e mail sender, observe these steps:
- Open the e mail from the sender you need to block.
- Click the choices icon on the top-right of the e-mail, then choose the “Block” possibility.
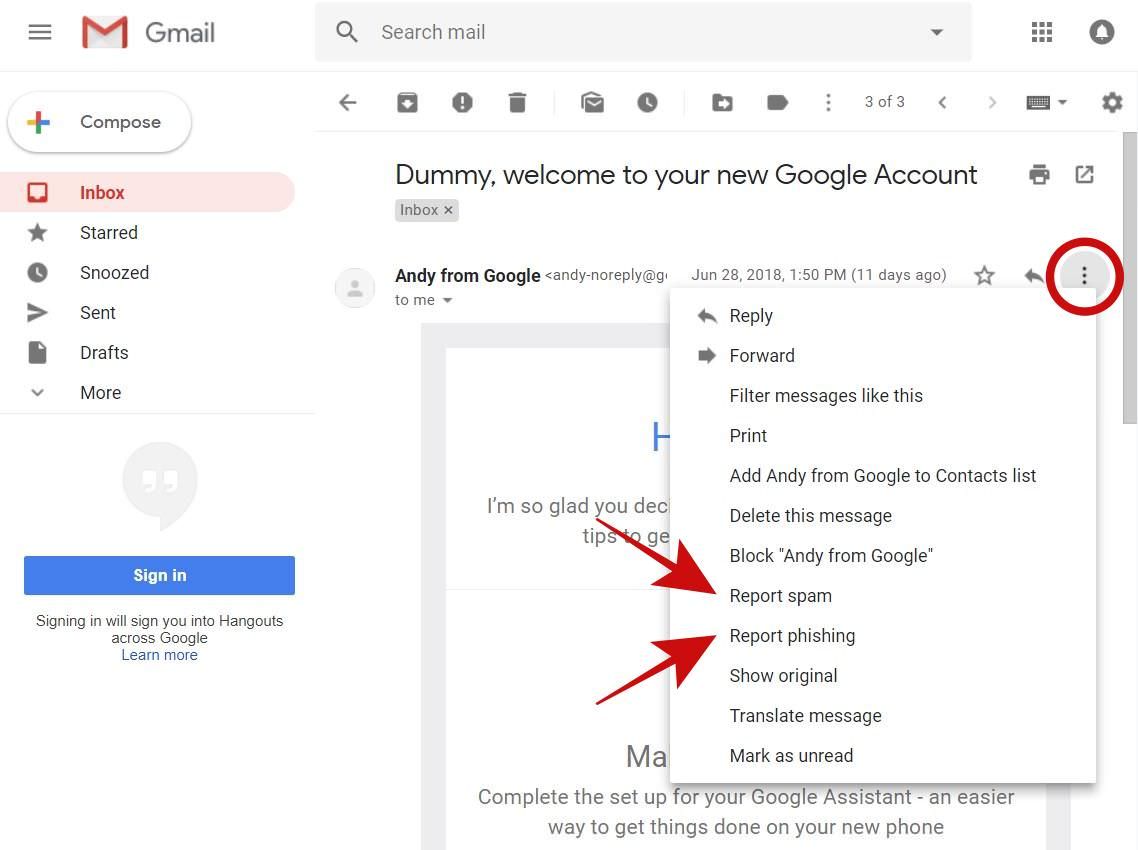
Report Junk or Harmful Emails
It’s commonplace to get junk or dangerous emails, particularly on work addresses shared with others. Nobody desires to learn these undesirable emails. If you get one, you possibly can report it. If Gmail agrees it’s junk or dangerous, it’ll mark related emails as spam sooner or later.
To report these emails, observe these steps:
- Open the junk or dangerous e mail in Gmail.
- Click the choices icon within the top-right nook, then choose both “Report phishing” or “Report spam” relying on what sort of e mail it’s.
I hope this put up helps you retain your Gmail account protected. Remember to watch out and observe security tips whenever you’re on-line. If somebody hacks into your laptop or on-line session, they could get into your emails too.
Check out more article on – How-To tutorial and latest highlights on – Technical News