How To Enable TPM 2.0 In BIOS.
TPM was once put in as a devoted chip on motherboards. But since TPM 2.0, it’s more generally carried out by way of a board’s chipset.
This implies that even with no discrete TPM chip in your board, you’ll be able to nonetheless allow TPM 2.0 from the BIOS.
Specifically, you’ll must allow the fTPM (AMD), PTT (Intel), and Security Device Support settings within the BIOS.
But earlier than you do that, take a minute to grasp what TPM is and why it’s possible you’ll need to allow it.
What is TPM? Should You Enable It?
TPM (Trusted Platform Module) is a know-how that improves the safety of your system in numerous methods. Mainly,
- It creates and shops cryptographic keys for safety providers like BitLocker and Windows Hello.
- It solely lets the PC boot if system integrity is verified by means of a mechanism referred to as Measured Boot.
- It helps mitigate frequent assault vectors like dictionary, ransomware, and firmware assaults.
In the present context, enabling TPM 2.0 can also be a requirement for putting in Windows 11 and taking part in Valorant.
If that you must allow TPM 2.0 for these causes or just need the safety advantages, begin by attending to your system’s BIOS UI.
Access the BIOS Setup Utility

Turn in your PC and repeatedly press the BIOS key (Del on most techniques). The PC ought to boot to the BIOS/UEFI.
If this technique doesn’t work, you may also use various strategies like WinRE to get to the firmware interface. This information on getting into the BIOS covers such strategies intimately.
Enable TPM within the BIOS
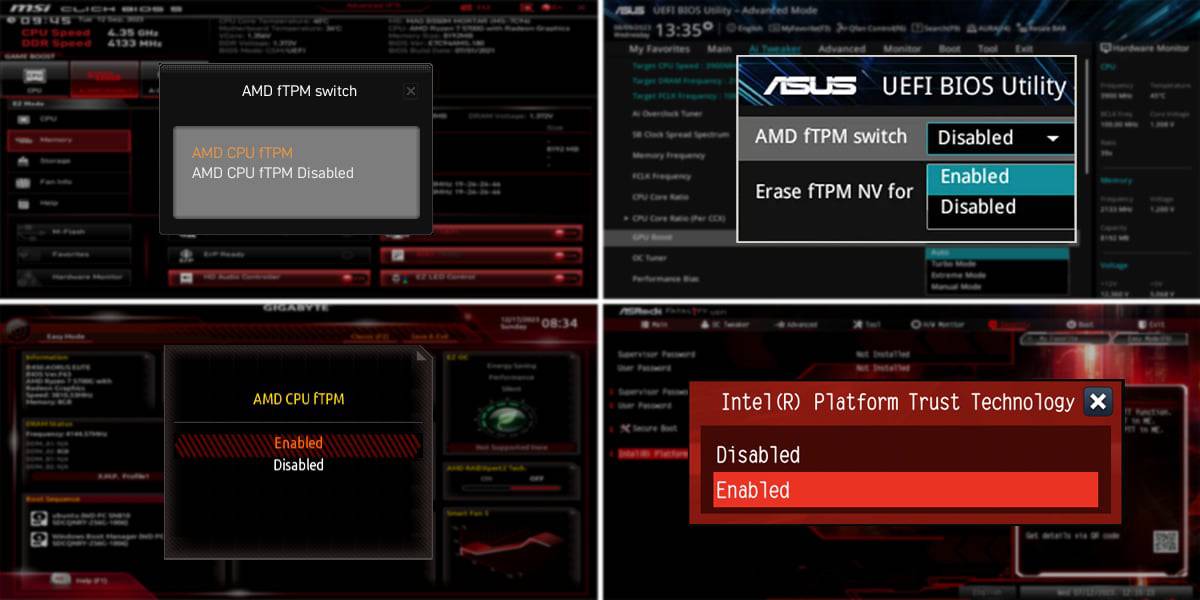
What we’re making an attempt to configure is firmware-based TPM. Intel calls it the Platform Trust Technology (PTT) whereas AMD calls it firmware-TPM (fTPM).
To allow Intel PTT,
- Go by means of sections like Advanced or Trusted Computing within the BIOS.
- Set Intel PTT to Enabled.

- Ensure Security Device Support is Enabled as nicely.

- Press F10 to avoid wasting the adjustments and exit the BIOS.


To allow AMD’s fTPM,
- Search sections like Security, Advanced, Peripherals, Trusted Computing, and many others.
- Set AMD CPU fTPM to Enabled.

- Ensure Security Device Support is Enabled.

- Press F10 to avoid wasting the adjustments and exit the BIOS.


Besides setting the TPM model, there’s not a lot else to do right here. Some boards allow you to configure superior settings like PCR banks and Platform Hierarchy however these are best left to default.
As for resetting TPM, I like to recommend doing that from Windows as a substitute of the BIOS.
Note: The BIOS UI differs in keeping with the producer and even between totally different BIOS variations from the identical producer. If you’re having a tough time enabling TPM, take a look at our devoted guides on enabling TPM on totally different techniques:
Verify TPM Status
After enabling TPM and exiting the BIOS, the PC ought to reboot to Windows. Open the TPM Management Console with the tpm.msc run command.

The standing ought to learn “The TPM is ready for use”.
If you ever must reset the TPM to the default state, you are able to do so from right here with the Clear TPM possibility.
What If TPM Isn’t Working
Sometimes, customers encounter errors like Compatible TPM not discovered regardless of enabling within the BIOS.
I like to recommend the next troubleshooting course of in such instances:
- Follow the identical course of as earlier to get to the TPM settings within the BIOS.
- Ensure each the PTT/fTPM setting and Security Device Support are enabled.
- If required, manually set the TPM device model to 2.0.

- Make positive to save the BIOS settings correctly.
- If you’re making an attempt to make use of a discrete TPM chip, guarantee it’s appropriate together with your board. Check the producer’s TPM 2.0 help checklist to do that.
- If the error is stopping you from putting in Windows, you’ll be able to bypass the TPM requirement.
- Finally, if TPM remains to be not working, consult with our information on coping with a TPM device that’s not detected.

Check out more article on – How-To tutorial and latest highlights on – Technical News